[Week 2] Learning Mixpanel: Mixpanel Basics
![[Week 2] Learning Mixpanel: Mixpanel Basics](/content/images/size/w1200/2026/02/91bdfc40-3f92-43f7-af9d-6748698bad70_977x370.png)
Introduction
Welcome to Week 2 of Learning Mixpanel. I'm Ansh, a Mixpanel Certified Partner. I’ve had the privilege of working with 50+ startups, helping them set up their analytics infrastructure and gain actionable insights using Mixpanel.
Curious about my work? Check out my website for case studies, testimonials, and more details about what I do.
Today, I’m going to talk about the basics of Mixpanel
Let’s get into it
Mixpanel Basics
If your preferred consumption is audio visual - access the video on Youtube.
The startup program by Mixpanel
Mixpanel offers their Growth plan (a paid plan) free for a year to startups. This can be a great way to get started with Mixpanel.
However, there are some eligibility criteria:
- Your company must be incorporated for less than five years.
- You should have raised no more than $8 million USD in total funding.
- You must not have previously redeemed other Mixpanel offers.
- You should not currently be on a paid plan.
If you meet these criteria, you can apply here and gain access to the Growth plan. Approval usually takes less than a couple of hours.
Suggestion: Apply for the Growth plan once you have data flowing into Mixpanel and are ready to start the analysis.
Before reaching that stage, you can use the free plan, and then, using the same email, apply for the startup program. This approach will help you maximize the benefits of the Growth plan.
Link to Apply to The Startup Program
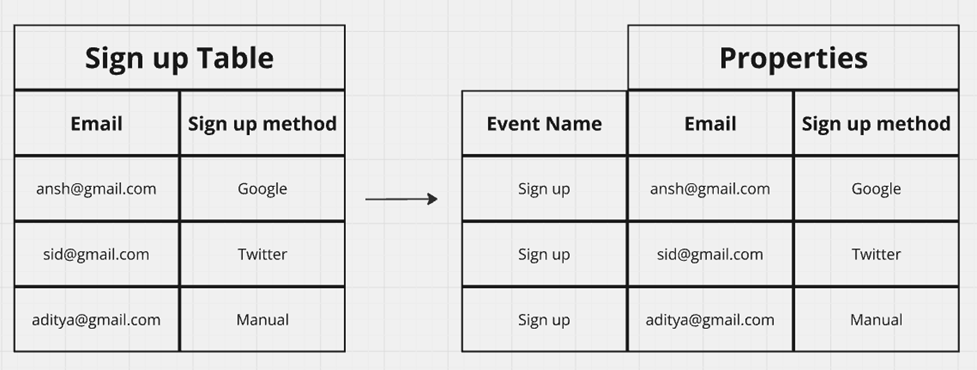
The Data Structure of Mixpanel
In Mixpanel, data is organized using events and properties. Think of it like a table, where events are the actions users take, and properties provide details about those actions.
Letʼs break it down with a simple example:
Scenario Example: Sign-up Table
- In a typical sign-up table, you might store the user's email and the method used to sign up.
- In Mixpanel terms, the sign-up action would be an event, while the email and sign- up method would be properties attached to that event.
Type of properties in Mixpanel
Event Properties
These are directly attached to an event, & help understand specifics of each action carried out by the user.
Helpful in answering questions like, “What is the distribution of payment plan types chosen by users when they upgrade to a paid plan?ˮ
Profile Properties
Unlike event properties, profile properties are tied to the user, not the event. Profile properties show the current state of a user, overwriting the previous values.
Helpful in answering questions like, “How many users are currently on the paid plan?ˮ
Super properties
Super properties are attached to every subsequent event after being set. Unlike profile properties, super properties donʼt overwrite previous values in past events.
* Helpful in answering questions like, “What payment plan was the user on, when they posted their 5th post on Instagram?ˮ
Example: Imagine a product with a freemium model where a user on a free plan upgrades to a premium plan, and then to a pro plan.
The event "user_upgraded" is triggered. The property "plan_type" is associated with this event, set as an event (plan_type), profile (plan_type_user_property), and super (plan_type_super_property) property.
Auto-capture vs custom events
Auto- capture
Mixpanel offers an auto-capture feature that automatically tracks each page or screen view in your product and sends this data to Mixpanel.
This feature sends a default event named "Page View" which includes properties around the Page URL, Referring Domain, etc.
It requires minimal setup—just a simple code snippet.
However, Auto-capture lacks detail. It can show that a form was filled out on your website, but wonʼt provide specifics about what was filled out - which is essential information to carry out analysis.
Custom events
Custom events allow you to track user interactions and define the specific data you want to capture. For example, you can create a "sign up" event with properties like email and sign-up method.
Itʼs more extensive to setup than auto-capture, as it requires inserting code for each event and property you wish to track at the relevant points in your product.
But, they provide a detailed view of user actions, enabling deeper and more accurate analysis of user behavior.
Best Approach Use both
- For Marketing Websites/Landing Pages Use auto-capture for tracking page views and basic interactions since major user engagement is just scrolling through pages.
- For Core Product Interactions Implement custom events to gain detailed insights into user behavior and interactions within the product.
Sessions
In Mixpanel, user activity is recorded in sessions. A session begins when a user visits your website and ends after 30 minutes of inactivity by default.
Each session is assigned a unique session ID, and specific events are triggered at the start and end of each session.
- Session Start Event This event is fired when a session begins, marking the start of user interaction.
- Session End Event This event is triggered when a session ends due to inactivity.
Customizing Session Timing
You can adjust how sessions are defined and ended by updating settings in the Project Sessions menu. There are three options for customizing session timing:
- Timeout Specify a time interval for inactivity, after which the session will automatically end.
- Event-Based Select custom event names to mark the beginning and end of a session (e.g., Enter Appand Exit App.
- Property-Based Use a session_id property. All user events that share the same session_id are considered part of the same session.
Valuable Data from Session Events
- Session Duration Seconds) Measures the time between the "Session Start" and "Session End" events, providing insights into how long users are active.
- Session Event Count Indicates the total number of events triggered during a session, excluding events marked as Excluded or Hidden in Lexicon.
- Session Start Event Name Displays the specific event name that initiated the session.
- Session End Event Name Shows the specific event name that ended the session.
Mixpanel learning course
Every week, I’m going to talk about one topic from Mixpanel. If you’d like to access everything at once, take a look at my course on Mixpanel.
The course is a comprehensive deep dive into Mixpanel, covering each feature with relevant, practical examples.
By the end of the course, you'll become a Mixpanel expert—equipped with the knowledge and confidence to navigate and use the platform like a pro.
Having worked with 60+ startups, I’ve structured this course to focus on what actually gets used in Mixpanel and how.
Each chapter includes a video tutorial and a written document (with visuals) so you can choose the learning format that suits you best—video, text, or both!

![[Week 28] Learning Mixpanel: Computed Properties](/content/images/size/w600/2026/02/e73fb366-1c52-4f79-a28f-4a0b60d6998c_836x723.png)
![[Week 27] Learning Mixpanel: Bucket Customisation Types](/content/images/size/w600/2026/02/a81f7bcb-4886-4711-b1b8-af8c5fc6b1b8_463x476.png)
![[Week 26] Learning Mixpanel: Mastering Attribution with Mixpanel](/content/images/size/w600/2026/02/4e3a164c-bfb1-479f-9f09-2f8890eac413_885x787.png)