[Week 26] Learning Mixpanel: Mastering Attribution with Mixpanel
![[Week 26] Learning Mixpanel: Mastering Attribution with Mixpanel](/content/images/size/w1200/2026/02/4e3a164c-bfb1-479f-9f09-2f8890eac413_885x787.png)
Introduction
Welcome to Week 26 of Learning Mixpanel. I’m Ansh, a Mixpanel Certified Partner. I’ve had the privilege of working with 60+ startups, helping them set up their analytics infrastructure and gain actionable insights using Mixpanel.
Curious about my work? Check out my website for case studies, testimonials, and more details about what I do.
Tired of Mixpanel data going wrong - events missing, properties breaking, or random spikes?
Pravix makes it simple to detect these issues and keep your data clean.
Today, I’m going to talk about how to use attribution in Mixpanel
Let’s get into it
If your preferred consumption is audio visual - access the video on Youtube
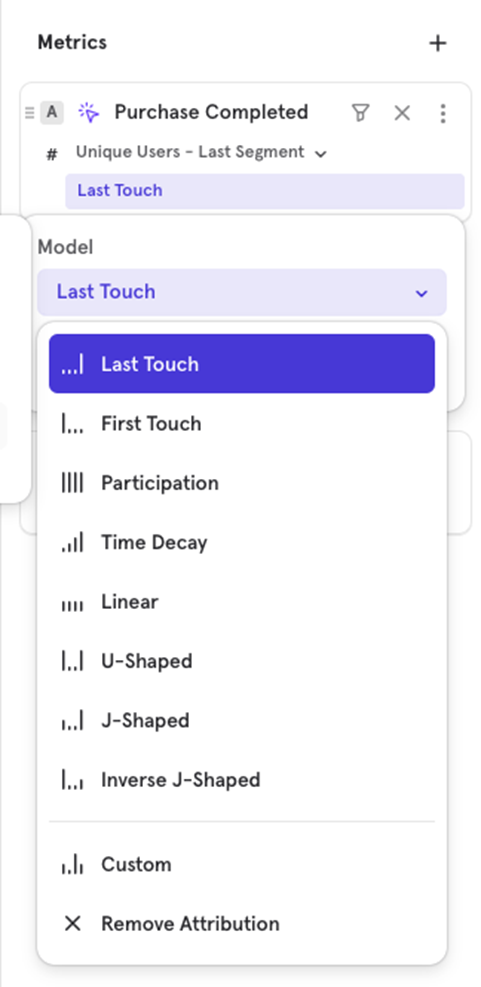
Attribution allows you to assign credit to different touchpoints in a user’s journey, helping you understand how different channels or interactions contribute to conversions. Mixpanel supports various attribution models, including single-touch models like First or Last touch and multi-touch models like U-shape or
Linear shape.
Imagine a user interacts with your product in the following sequence:
- Comes from Facebook
- Later visits via Google
- Finally, makes a purchase.
Now, depending on your attribution model, you might want to credit Facebook fully or split the credit between Facebook and Google. Mixpanel enables you to choose how to allocate this conversion credit.
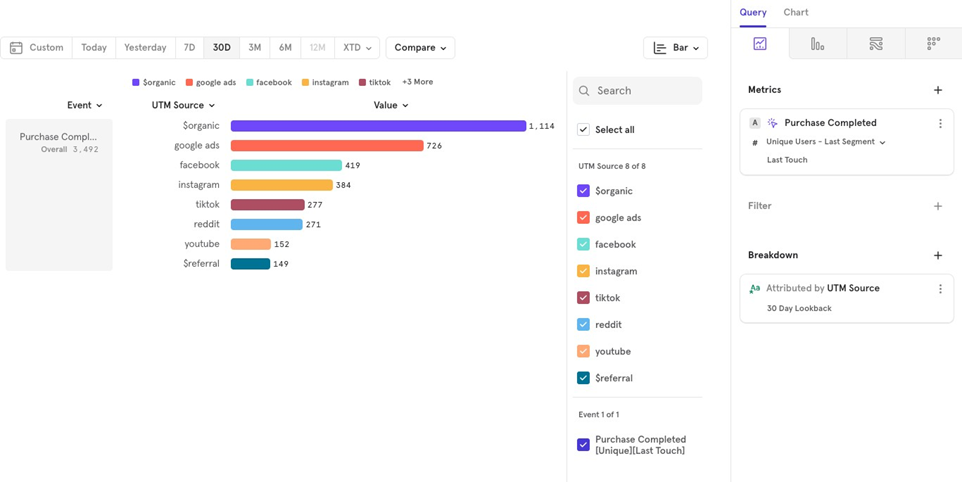
You can set this up by selecting Breakdown , Computed , Attributed by in your report.
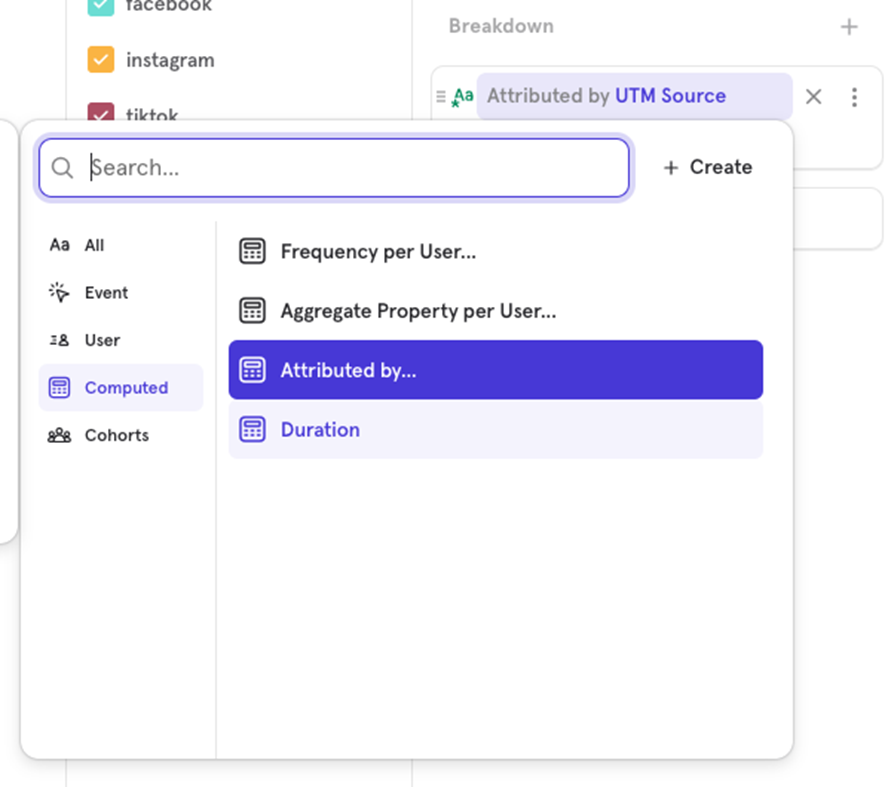
Now you want to attribute your Purchase Completed event by UTM sources, where you would see which channels Facebook, Google, etc.) contributed to the conversion.
There are two major factors you can customize when using attribution in Mixpanel:
- Look-back Window: Defines how far back Mixpanel should look for touchpoints to attribute credit.
- Attribution Model: Determines how credit is distributed among the touchpoints.
Look-back window
The Look-back window allows you to define a time period in the past during which Mixpanel will consider eligible touchpoints for attribution.
Example:
Letʼs say youʼre analyzing the Purchase Completed event, attributed by UTM sources. You want to only account for the UTM sources a user interacted with in the last 10 days before making a purchase. By setting
a 10-day look-back window, only UTM sources from this period will be considered in the attribution model.
This ensures that any interactions or UTM sources older than 10 days before the purchase wonʼt be factored into the attribution.
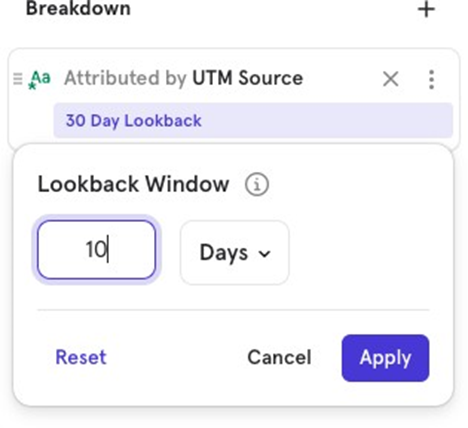
The maximum look-back window Mixpanel currently offers is 30 days.
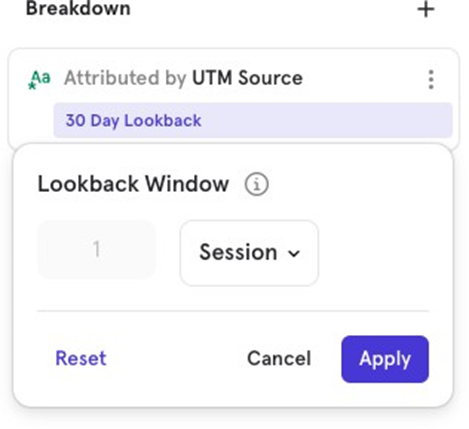
Instead of setting a look-back window based on a number of days, Mixpanel also allows you to use Mixpanel sessions as the look-back window.
At present, Mixpanel supports looking back only 1 session when using this method.
Attribution models
Mixpanel provides various attribution models that determine how to distribute credit across user touchpoints when evaluating conversion paths. Hereʼs an overview of the models and how they function with a specific scenario.
Hereʼs a scenario:
- A user first visits your website from Facebook
- Later, they come back via Google
- Finally, they visit from LinkedIn and make a purchase
There are 3 touchpoints before the conversion, and each attribution model would handle them differently.
First Touch
100% credit is given to the first touchpoint.
In our case: 100% to Facebook
Last Touch
100% credit is given to the last touchpoint.
In our case: 100% to LinkedIn
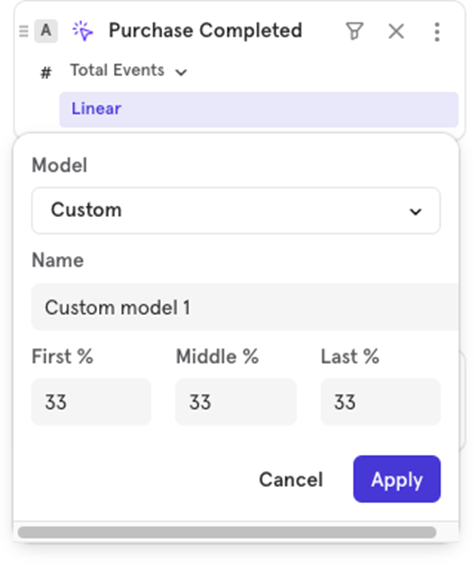
Linear
Equal credit is given to all touchpoints.
In our case: 33.33% to Facebook, 33.33% to Google, and 33.33% to LinkedIn each
Participation
100% credit is given to every touchpoint, inflating the total number of conversions.
In our case: 100% to Facebook, 100% to Google, and 100% to LinkedIn each
Time-Decay
Credit decreases exponentially the further back the touchpoint occurred before the conversion, with a 7-day half-life parameter.
In our case: Credit is distributed based on how close the touchpoints are to the purchase, with more credit to recent touchpoints like LinkedIn.
U Shaped
40% of the credit goes to the first touchpoint, 40% to the last, and the remaining 20% is split across all intermediary touchpoints.
In our case: 40% to Facebook, 20% to Google, and 40% to LinkedIn
J Shaped
20% of the credit goes to the first touchpoint, 60% to the last, and the remaining 20% is split across all intermediary touchpoints.
In our case: 20% to Facebook, 20% to Google, and 60% to LinkedIn
Inverse J Shaped
60% of the credit goes to the first touchpoint, 20% to the last, and the remaining 20% is split across all intermediary touchpoints.
In our case: 60% to Facebook, 20% to Google, and 20% to LinkedIn
Custom
You can define the percentage of credit for the first and last touchpoints, while the remaining percentage is distributed across the intermediary touchpoints.
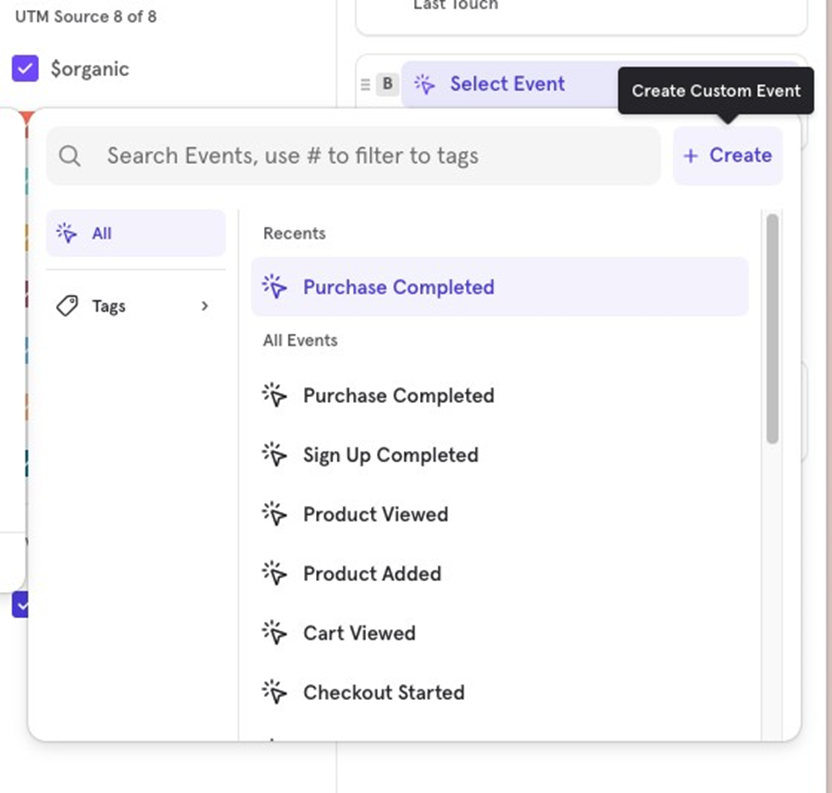
Custom events
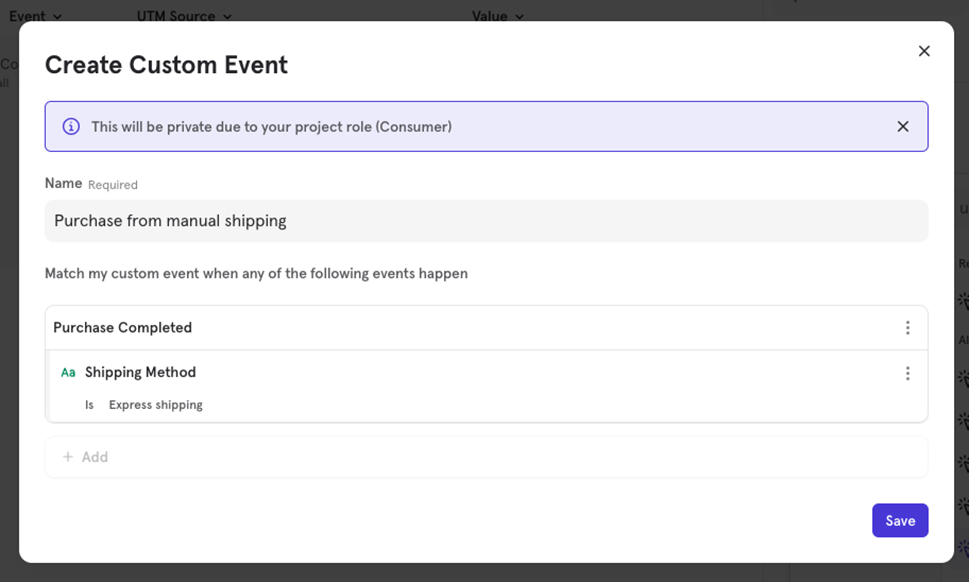
Custom events allow you to combine existing events or filter specific actions together for more convenient analysis. For instance, if you want to track a combination of actions like “Purchase Completed” and “Order Completed” as a single event, you can create a custom event.
Here’s how to create a custom event in Mixpanel:
- Click on “Createˮ in the event selection menu.
- Select the base events you want to use.
- Set conditions to narrow down the events. For example, you can add filters such as “Shipping Method Expressˮ to ensure the custom event only tracks purchases completed with express shipping.
Name your custom event and save it.

![[Week 28] Learning Mixpanel: Computed Properties](/content/images/size/w600/2026/02/e73fb366-1c52-4f79-a28f-4a0b60d6998c_836x723.png)
![[Week 27] Learning Mixpanel: Bucket Customisation Types](/content/images/size/w600/2026/02/a81f7bcb-4886-4711-b1b8-af8c5fc6b1b8_463x476.png)
![[Week 25] Learning Mixpanel: Warehouse Connectors](/content/images/size/w600/2026/02/4cff7069-5e30-4732-9d61-2e24087994f7_968x616.png)